Wednesday 30 March 2011

How To Use Keyboard & Mouse With Multiple Screens/Computers With Synergy

Synergy

Source: Afterdawn.com By James "Dela" Delahunty

This guide shows how to use Synergy with two or more systems to emulate a dual-screen setup. Synergy allows you to use the same keyboard and mouse on two or more systems. Moving the mouse from one screen to another is as simple as moving the pointer off the side of the screen. 

It also shares a clipboard among multiple systems, making it possible to copy and paste text between them. Synergy is technically multi-platform, though for now we are only including Windows operating systems in this article.


Introduction & Requirements


Software you must download and install
 Synergy
 Required: In order to follow this guide you need to install Synergy on all the systems you will be using it on. See more information later.. Download!

Synergy will require that all of the systems you are going to use it with be on the same network, whether it is wired or wireless, and should be able to easily communicate with each other (check firewall settings etc.). 

What is Synergy?


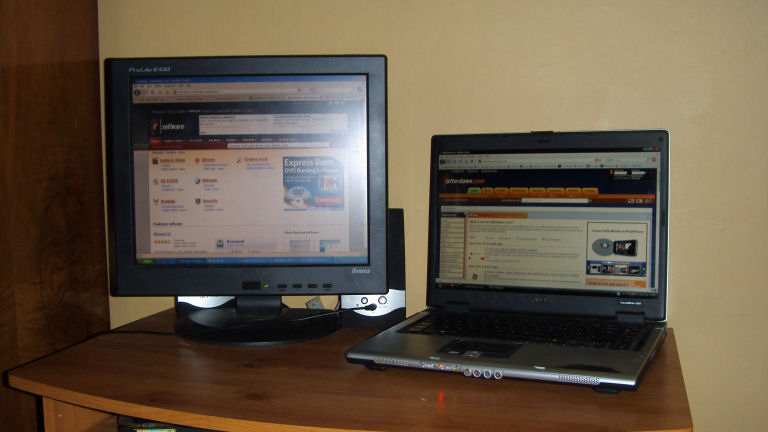
Synergy lets you easily share a single mouse and keyboard between multiple computers with different operating systems, each with its own display, without special hardware. It's intended for users with multiple computers on their desk since each system uses its own monitor(s). 

Redirecting the mouse and keyboard is as simple as moving the mouse off the edge of your screen. Synergy also merges the clipboards of all the systems into one, allowing cut-and-paste between systems. Furthermore, it synchronizes screen savers so they all start and stop together and, if screen locking is enabled, only one screen requires a password to unlock them all. 

In the example picture, the 17-inch LCD to the left is the monitor of the main computer. To the right of it is an old laptop. It has been setup with Synergy to use the same keyboard and mouse, to emulate a dual-screen setup when a second monitor and/or dual-monitor hardware is not available, or is otherwise impossible. Both are connected to the same wireless network. 

Server and Client(s)


Whichever computer is hooked up to the keyboard and mouse that you will be using for all of your systems is your SERVER. Every other system is a CLIENT. In this guide, as an example, I will setup Synergy on the server and client shown and get it to run. 

free web site traffic and promotion

Click On Read The Rest Of This Post To Read Full Guide with Text & Images:----


Sunday 27 March 2011

A Little Attempt By 'How2dothingsonline.com' To Give a Short Introduction To Describe a Motive Of This Website

How To Do Something New by How@fb

A Littel Ateempt By How2dothingsonline.com To Give a Short Introduction To Describe a Motive Of This Website......Hope you like it.....

Regards

How2dothingsonline.com.....

A Step-By-Step-Guide For How to Boost Your Wi-Fi Network Signal and Increase Range with DD-WRT

Router
Source: howtogeek.com

Wireless is really convenient until you drop your connection or get really low speeds. Thanks to DD-WRT, it’s easier than ever to extend your home networks range with a few simple tweaks and a spare router.

DD-WRT is a fully feature-packed alternative firmware for your router. If you don’t know what it is or how to get it on your device, you should start off with Turn Your Home Router into a Super-Powered Router with DD-WRT.

Boosting Your Signal

Fire up your web browser and direct it to your router’s configuration page. Go to Wireless > Advanced Settings.

tx power

There are three settings of interest, the first being TX Power. This is the broadcasting power of your transmitting antenna. The default is a safe value of 70, but we can kick it up a bit. Most people report that jumping up to a 100 is safe. Pushing it higher can cause excessive heat which can damage your router. I don’t have to worry about that since my “server area” is cold and I’m also a bit reckless, so I kicked mine up to 150. It’s been that way for a few weeks and I haven’t had a problem yet, but your mileage may vary. Use your common sense and discretion.

Next up is the Afterburner setting. If your wireless router and adapters support Afterburner – also known as SpeedBooster, SuperSpeed, Turbo G, and G Plus (but not Super-G) – you can enable this to get a boost. Things may slow down if they don’t support it, though, so be sure to do your homework. B-only devices won’t see any problems and N-based devices shouldn’t be negatively affected, either.

Finally, we get to Bluetooth Coexistence Mode. If you use bluetooth a lot, then you may have noticed a drop in reliability or speed with both wireless and bluetooth devices. Turning this setting on should keep the two from interfering too badly with one another.

Use a Spare Device as a Repeater

Most of us have upgraded our networks with new routers over the years. If you have your old one lying around, why not throw DD-WRT on it? I had a spare Linksys wireless access point, but after putting alternate firmware on it, I had a full-blown router on my hands. We can put our spare device to work as a repeater, which can act as a range-extender for a new section of your house or yard.

Under Wireless > Basic Settings, change the mode to Repeater.

repeater

free web site traffic and promotion

lick On Read The Rest Of This Post To Read Complete Guide With Text  & Images:-

Wednesday 23 March 2011

40 Useful Google Chrome Extensions For Web Designers

Chrome
Source: hongkiat.com  By Alvaris Falcon

I love Google Chrome. Its simplicity, speed and performance are top notch, undoubtedly. But sometimes, being too simple is also a problem, especially for us web designers who rely heavily on Firefox addons like Web Developer. I walked away from Chrome, yeah, just because it had no addon back in 2008.


But now, everything changes again. It has no surprise that other geeks are having the same love to Chrome and they decided to create Chrome Extension, which has similar function to Firefox Addon. I digged into those extensions and was very satisfied to them, therefore I decided to pick up 40 extensions which is extremely helpful for web designers and share with you guys.

So here they are for you, gear your Chrome and boost your productivity up.

Typography

Font Editor

No more guessing and tiring program switching, Font Editor allows you to modify and observe font setting like size, line height and variant lively.

font editor 40 Useful Google Chrome Extensions for Web Designers

Google Font Previewer

As specified in its name, this extension allows you to preview font from Google Font Directory with text styling options which are size, style, weight and shadows. If you are satisfied with particular font, you can copy and paste the link and the CSS code provided in the extension to your website’s code to use the font.

google font previewer 40 Useful Google Chrome Extensions for Web Designers


free web site traffic and promotion

Click On Read The Rest Of This Post To Read Complete Guide With Text  & Images:-

Monday 21 March 2011

How To Disassemble A Nokia X6: A Step By Guides

Nokiax6
Source:formymobile.co.uk

Tools required: Phillips screwdriver, Torx 6 screwdriver, plastic tool such as a guitar plectrum or credit card.

  • Remove your back cover, battery and sim.

Nokia X6 disassembly stage 1

  • Use something like the edge of a credit card to lever the bottom cover off.

You Can Also Watch a You Tube Video Guide Instruction To Complete This Task..... 

Nokia X6 disassembly stage 2

  • Your phone should now look like below.

Nokia X6 disassembly stage 3

  • Lift the phone up and you'll see a screw, circled below. Remove this screw.

Click On Read The Rest Of This Post For Complete Guide With Text & Image:

free web site traffic and promotion

Sunday 20 March 2011

A Step-By- Step Guides To Installing Windows 7

Window7woodfinal


Source: petri.co.il

Planning the Installation

As with any OS installation, we must first plan the installation process. When you run the Windows 7 Setup program, you must provide information about how to install and configure the operating system. Thorough planning can make your installation of Windows 7 more efficient by helping you to avoid potential problems during installation. An understanding of the configuration options will also help to ensure that you have properly configured your system.

Here are some of the most important things you should take into consideration when planning for your Windows 7 installation:

  • Check System Requirements
  • Check Hardware and Software Compatibility
  • Determine Disk Partitioning Options
  • Complete a Pre-Installation Checklist

Microsoft states the  minimum recommended specs for Windows 7:

  • 1 GHz 32-bit or 64-bit processor
  • 1 GB of system memory
  • 16 GB of available disk space
  • Support for DirectX 9 graphics with 128 MB memory (to enable the Aero theme)
  • DVD-R/W Drive
  • Internet access (to activate and get updates)

 32-bit or 64-bit Version?

You need to decide whether to install the 32-bit or 64-bit version of Windows 7. The Windows 7 installation disc package includes both 32-bit and 64-bit versions of Windows 7. Basically, the 64-bit version of Windows handles large amounts of random access memory (RAM) more effectively than a 32-bit system. So if you plan on using Windows 7 on a computer with more than 3 GB or RAM, I would strongly suggest to use the 64-bit version. Most programs designed for the 32-bit version of Windows will work on the 64-bit version of Windows, and if they don't, you can always use Windows XP Mode (read my "How to Install Windows XP Mode on Windows 7" article). 

Note: Either way, you cannot use an existing 32-bit version of a previous OS to perform an in-place upgrade to a 64-bit version of Windows 7, and you'll need to format and install a fresh copy. Also, you cannot use an existing 64-bit version of a previous OS to perform an in-place upgrade to a 32-bit version of Windows 7.

Type of Installation

Basically, there are 2 approaches to installing Windows 7:

  1. Upgrade (In-place upgrade) - This option replaces your current version of Windows with Windows 7, and keeps your files, settings, and programs in place on your computer.
  2. Custom ("fresh" installation) - This option replaces your current version of Windows with Windows 7, but doesn't preserve your files, settings, and programs. It's sometimes referred to as a clean installation for that reason.

As always, a fresh installation is much better and I strongly recommend taking that track. Even if you've got an existing Windows XP/Vista OS on your computer, I would strongly recommend that you format it and install a fresh copy of the OS.

This article will focus on a fresh installation of Windows 7. Please read my "How to Upgrade from Windows XP to Windows 7"  and "Upgrade from Windows Vista to Windows 7" articles for more information on those paths.

Beginning the Installation Process

When installing on a physical computer insert your Windows 7 DVD media into your DVD drive and reboot your computer. If you're asked to press a key to boot from DVD or CD, press any key. A black window will appear momentarily while the DVD content is read.

Note: These screenshots are taken from a Windows 7 Ultimate installation performed on a virtual machine running on VMware Workstation. I will be using an .ISO file mounted on the VMs CD/DVD drive.

Next, a Starting Windows screen will appear.

Note: If the Windows installation page doesn't appear and you're not asked to press a key to start from DVD or CD, you might have to specify that your computer uses its DVD or CD drive as the startup device.

free web site traffic and promotion

Click On Read The Rest Of This Post For Complete Guide With Text & Image: 

Friday 18 March 2011

How To Draw King Julian From Penguins of Madagascar with Easy Steps


Kingjulian

Source: drawinghowtodraw 

The Penguins of Madagascar is a Nickelodeon cartoon show that comes from the Movie Madagascar. Today, I am teaching you how to draw King Julian, a ring-tailed-lemur, from Penguins of Madagascar. I have put together an easy step by step drawing tutorial that builds up King Julien’s form with simple shapes. Not only will young kids be able to do this, but also teens and adults will enjoy it as well. Find the easy Private drawing lesson & instructions below. Good luck.

Step 1


Start off drawing King Julian by drawing the basic shapes that make up his face…a circle and an oval. King Julian isn’t looking straight ahead so his facial features are closer to the right side of his face. Put a guideline in the center horizontally (left and right) of the circle and a line further to the right than center vertically (up and down).

Step 2

Now lightly sketch a guideline in the center of the left side of King Julian’s face.

Step 3

Now draw both eyes…the one on the right is a little smaller and a little bit more of an egg shape. Use the guidelines to figure out where to place his eyes.

free web site traffic and promotion

Click On Read The Rest Of This Post For Complete Guide With Text & Image: 

Tuesday 15 March 2011

A Step-By-Step Guides To Create A TRON Minimal Design In Photoshop

Tron
Source: hongkiat.com By Vectorious

TRON is definitely one of the geek’s dream-come-true movie. It’s suit and vehicles are perfectly slick which is why the attempts to assemble objects that replicates tools in TRON has been surfacing around the Internet. As for designer’s, with the right clicks and tricks using Photoshop, a TRON fiction does not neet to be hard.

Today we will create a TRON wallpaper in Photoshop using stock photos and vectors. We will give you a precise guidance on how to do it and why certain method is better. You will get an in-depth comprehension of what you are doing. Buckle up for digital dream!

You will learn how to:

  • Analyze your design from out-of-the-box point of views
  • Create structured designs, based on hidden or related elements in your composition
  • Use shortcuts for a faster work flow
  • Make complex selections and cutouts via Channels
  • Effectively use general tools
  • Add perspective to your design
  • Combine vectors with pixels
  • Create light effects
  • Use blending modes
  • Use layer styles

Difficulty: Beginner – Intermediate. Completion time: 1 hour. Tools: Photoshop CS3, Illustrator CS3 optional.


Resources:

NOTE: To install the font, extract on Desktop the .zip archive containing the font, then copy them. Go to C:\WINDOWS\Fonts\ directory and paste them in.

A Few Thumbnail View Of Steps To Complete This Task:-

free web site traffic and promotion 

Click On Read The Rest Of This Post For Complete Guide With Text & Image: 

Monday 14 March 2011

How To Installing iPad Wi-Fi Ambient Light Sensor

Light_senser

Source: ifixit.com By : Andrew Bookholt

Use this guide to replace a broken ambient light sensor.

Tools

Step 1 — Display Assembly
  • Insert a metal spudger between the top edge of the display assembly and the rear panel assembly.

  • Rotate the spudger away from you to release the tabs along the top edge of the display.

  • Insert a second metal spudger between the top edge of the display assembly and the rear panel assembly to keep the tabs from snapping back into place.

Step 2

•  With one spudger, work your way along the right edge of the iPad, releasing tabs as you go.

free web site traffic and promotion

Click On Read the Rest Of This Post To Read Full Guide With Step-By-Step Instructions:-

Friday 11 March 2011

How To Add Your Own Domain to Your Tumblr Blog Step-By-Step

Tumblerfinal

Source: How-to-geek

Would you like to personalize your Tumblr blog with your own domain name?  Here’s how you can redirect a domain to Tumblr and register it with your blog.

When you signup for a new Tumblr Blog, by default your blog’s address will beyour_blog_name.tumblr.com.  One of the best reasons to use your own domain name is that you could always move the domain to another blog service if you decide to switch and quit blogging at Tumblr.  With your own domain, your blog’s identity is secure, and best of all, once you own a domain it’s free to add it to your Tumblr.  Here’s how to do it.

Redirect Your Domain to Tumblr

First, you need to own a domain name.  There are many popular domain registrars, and you can usually signup for a new domain name for around $10.  If you don’t already have one, find a domain hosting service you feel good with and signup for a new domain name.

Once you’ve got a domain name, you need to direct your domain name to point to Tumblr’s servers.  Or, if you want to keep your domain name at a current site, you could redirect a subdomain to Tumblr.  Our domain was hosted with 1&1, so here’s how to do it there; the process is generally the same on other registrars, though the wording may be slightly different.  Login to your domain administration page, and if your hosting company offers multiple services, select to Manage your Domain.

sshot-2010-06-16-[22-41-57]

Now select your domain name, click the DNS button, and select Edit DNS Settings.  Again, this may appear different depending on your domain registrar, but should in general work the same.

sshot-2010-06-16-[22-43-03]

Now, on the IP Address settings, select Other IP address, and then enter Tumblr’s IP address:

72.32.231.8

free web site traffic and promotion

Click On Read The Rest Of this Post to Read Full Guide With Text & Image

Wednesday 9 March 2011

How to Transfer All Your Information To A New PlayStation 3

Manwithps3
Source: How-To-Geek

The PlayStation 3 now costs half the price, has double the storage, and uses half the power. If you need another reason to upgrade, Sony also makes it easy to transfer all of your information to a new console.

Transferring all of your games, data, and settings is easier than ever, and all you need is an ethernet cable. Read on as we walk you through the whole process of setting up your new PS3 and wiping all your information off the old one.

Prep the old PlayStation 3

The first thing you need to do is sync all of your trophy information to Sony’s servers. In the XMB go to game -> trophy collection and push triangle on your controller. The menu will open and you can select sync with server.

The sync will take a few minutes but once it completes all of your trophies will be safely copied on Sony’s servers.

You Can Also Watch The Whole Process From Start To Finish Together In This video:-

free web site traffic and promotion

Click On Read The Rest Of This Post To View Full Guide With Text & Images:-