Thursday 30 June 2011

How To Apply Textures to Uneven Surfaces

Evensurface

Source: psd.tutsplus.com By James Davies 


Applying texture to a flat surface, or flatly applying a texture across a whole image (as a means to age it or degrade it) is simple stuff. Realistically applying a texture to an uneven surface is much more hands-on (more so than simply overlaying a texture and changing the Blending mode).


Video Tutorial

Our video editor Gavin Steele has created this video tutorial to compliment this text + image tutorial.


Step 1

Job number one, as ever, is pooling your assets together. I got the man from iStockphoto here and the tree bark (courtesy of K. Tuck) from stock.xchng here.


Step 2

Cut out the face using the Pen tool (set to Paths not Shape Layers). Cut and paste it into your blank canvas (1562 pixels by 1172 pixels at 300dpi). Open up the bark image, and import it into your working document. Resize and rotate the document as in the screengrab.


Step 3

Use the Clone Stamp tool to fill in the rest of the texture. Avoid easily recognizable repetitions in the texture like the ones circled. Clone them out. I used a 200 pixel, soft-edged brush to do this

Click On Read The Rest Of This Post To Read Full Guide With Text & Images:-

Tuesday 28 June 2011

How to Transfer Photos From Camera or SD Card To iPad Directly

Ipadkit
Source: simonblog.com By farrukh zafar


Transfer Photos with iPad camera connection kitSo you’ve always wondered there should be something that can make the photo transfer from your camera to the iPad a bit faster than what it takes to do it through iTunes. No worries, there’s this Apple iPad Camera Connection Kit to make your life easier! This is actually a hardware accessory that lets you connect a SD card into your iPad or let’s you plug your camera in to your iPad straight, using a USB. No computer in between the transfer is required. It’s between your camera and iPad now. Sense the ease?
 
Here’s the how-to guide for you:

Step 1

Get the Camera Connection Kit at Amazon.com or Apple Store

Step 2

Opt for the suitable connector. The kit includes two connectors with different interfaces. You can connect to your camera directly via the USB interface. Or simply insert the SD card into the connector with SD card reader.

Step 3

Connect Camera Connection Kit to your iPad.

iPad Camera Connector

Click On Read The Rest Of This Post To Read Full Guide With Text & Images:-

Sunday 26 June 2011

How to Install Mac OS X on a PC (Without Using a Mac)

Mac
Source: Makeuseof.com by Jorge Sierra

There are many great tutorials on the web forusing a Mac to install Mac OS X Snow Leopard on a PC. Unfortunately, you may be unable to follow such tutorials if you do not readily have access to a Mac to perform the preparation necessary for the installation.

Great progress has been made in hacking PCs to run OS X, and it is now possible to install Mac OS X without a Mac. Thanks to some great tools put together by some brilliant hackers, it is also much easier and does not involve nearly as much time and effort as was once required.


Step 1: Getting The Hardware Ready

I recently purchased the following set of hardware for the purposes of building a Hackintosh (often PCs running Mac OS X are referred to as such):

  • Intel Core i3-530 Clarkdale 2.93GHz
  • Gigabyte GA-H55M-USB3 Motherboard
  • 4 GB DDR3 1333 RAM (2 x 2GB)
  • DVD Burner
  • MicroATX Computer Case
  • 585 Watt Power Supply
  • 4-pin to 8-pin Power Adapter

The motherboard has an 8-pin power connector on it, and although it is possible to connect a single 4-pin connector to it, you may encounter odd issues running with just a single 4-pin connector. To ensure that you provide sufficient power to the board, you should purchase the 4-pin to 8-pin power adapter. Alternatively, you could purchase a power supply with 3x 4-pin connectors (1 for the 20+4-pin main connector, and 2 for the 8-pin connection) or an 8-pin connector.

Step 2: Prepare The Boot Disk

In addition to the hardware and a retail copy of Mac OS X Snow Leopard, you’ll also need a blank CD. You may want to use a rewritable CD if you’re using a different hardware configuration, just in case the first one I recommend doesn’t work for you. There are two boot disk images that will allow you to install OS X directly from the installation DVD:

I successfully used both of them with my hardware setup. However I recommend you try iBoot first, as it is a bit leaner and doesn’t take as long to boot. If you’re using my hardware configuration, be sure to download the iBoot Supported disk image. If you use Empire EFI, download the Empire EFI v1.085 R2 image.

You can use one of many free programs to burn CDs if you don’t have one. Be sure to use the disk image burning mode in your CD burning software. Do not just simply copy the disk image file to a blank CD. I like InfraRecorder, because it makes this very easy. All you have to do is click the Write Image button, select the image, and burn it. Once again, you may wish to use rewritable media if you’re using a different hardware configuration than mine.

Click On Read The Reast Of This Post To Read Compleat Guide With Text & Images:-

Friday 24 June 2011

How To Remove LCD Screen, Inverter And Hinges From Compaq Presario F700 Laptop

How2remov
Source: insidemylaptop.com

In the following guide I will be removing the LCD screen, inverter board and display hinges from a Compaq Presario F700 laptop. The display disassembly steps will be very similar for Compaq Presario F500, HP G6000 and some other HP/Compaq laptops. If this guide works for you, please mention your laptop model in the comments below.

If you want to replace the LCD screen or inverter board, it’s not necessary to remove the whole display panel as it shown on the picture above. You can do that while the display panel is still attached to the laptop base.

If you want to replace display hinges, you’ll have to remove the display panel first.

You can find the display panel removal instruction in my previous disassembly guide for a Comapq Presario F700 notebook. Follow steps 6-12 to remove the display panel assembly.

DISPLAY DISASSEMBLY INSTRUCTIONS.

STEP 1.

Using a sharp object remove eight screw seals from the display bezel. Remove eight screws found under the seals.

STEP 2.

Start separating the display bezel from the cover with your fingers.

Continue removing the bezel.

The display bezel has been removed.

Click On Read The Reast Of This Post To Read Full Guide With Text & Images:-

Thursday 23 June 2011

How to Draw Lightning McQueen from Disney Cars Movie Step by Step Lesson

Wallpaper123

Source: drawinghowtodraw.com

Now we will show you how to draw Lightning McQueen, the red race car from Disney’s Cars movie. He is the main character in the movie. Even if you aren’t good at drawing, these easy-to-follow steps will guide you through the process of drawing this race car.


How to Draw Lightning McQueen from Disney Cars Movie Step by Step Lesson

Step 1

Step 1 : Drawing Lightning McQueen Step by Step Tutorial

Start with 2 rectangles side by side.

Step 2

Step 2 : Drawing Lightning McQueen Step by Step Tutorial

Then draw a trapezoid on top.

Step 3

Step 3 : Drawing Lightning McQueen Step by Step Tutorial

Place 3 squares where the wheels should be.

Step 4

Step 4 : Drawing Lightning McQueen Step by Step Tutorial

Now draw the details for Lightning McQueen’s rear flaps and windshield. Add the eyes on top of the windshield.

Here are Other Method To Draw Lightning McQueen (Cars) In 13 different  Steps:-

Click On Read The Rest Of This Post To Read Full Guide With Text & Images:-


Step 5

Step 5 : Drawing Lightning McQueen Step by Step Tutorial


Step 6

Step 6 : Drawing Lightning McQueen Step by Step Tutorial

Now draw McQueen’s flame designs. Add the headlights and a cheeky grin on his bumper.

Step 7

Step 7 : Drawing Lightning McQueen Step by Step Tutorial

Draw the wheel designs next.

Step 8

Step 8 : Drawing Lightning McQueen Step by Step Tutorial

Blacken your outlines and put a few more details on the car. There’s McQueen straight from the Piston Cup.

Step 9

How to Draw Lightning McQueen from Disney Cars Movie Lesson


Above you can see the colors that you should use to colorize Lightning McQueen. I hope this drawing lesson helped you.

Sincere Thanks To drawinghowtodraw.com Team toMake This Easy For Us....

DISCLAIMER


We DO NOT host or upload any of the links or any other content that are available on this WEBSITE. We merely search on INTERNET and index popular sites openly available to anyone. These articles and other content are uploaded to the respective websites (FORUMS) by their User Communities from all over the World and NOT by us. Please Contact Us through E-Mail, if you feel that any Content on this WEBSITE are objectionable or violating your copyrights. The objectionable content shall be promptly removed from our WEBSITE. E mail:
   

Tuesday 21 June 2011

10 Killer Photoshop Tips For Web Designers

Killer2

By Alvaris Falcon Source: Hongkiat.com 

Believe it or not, if you’re using Photoshop to design website, you’re on the right path to become a successful web designer. This is simply because Photoshop is one of the most advanced tool in the design industry that can make your creative imagination comes true with its plethora of professional tools which boost your productivity at the same time.

But how well do you know about Photoshop? Sometimes we’re wondering why certain web designer can design a website layout with extremely heavy graphics in 5 days, while we need around 10 days to complete that kind of design. It’s probably not about how fast you can click, it’s about how well you know about Photoshop, how you gonna unlock its full potential to boost your productivity.

adobe photoshop killer tips 10 Killer Photoshop Tips For Web Designers

We want you to know how to unlock its full potential. Yes, that’s why we created this post, to provide you 10 extremely useful Photoshop tips to boost your design speed. There can be shortcut, feature or setting you don’t know about, but not anymore. With this article you gonna learn them all, and you will design faster, and faster.

Note: Shortcut keys mentioned in this article are in Windows Photoshop format. If you are using Mac, be sure to know that Ctrl = Cmd (Command) and Alt = Opt (Option).


10. Undo, More Undo Please

I totally believe that we designer are very addictive to undo something, even until when we made a mistake on sketching, we tend to ‘undo’ it.

Well as you might know by pressing Ctrl + Z in Photoshop you can undo the previous action you made, but when you press the same key combination again, it will redo the previous action. This is quite unnatural and troublesome as you always need to undo multiple times to get to the state you want.

keyboard shortcut panel 10 Killer Photoshop Tips For Web Designers

Believe it or not, Photoshop has a specific button for multiple undo, and it is Alt + Ctrl + Z. Yes, by using this key combination you can undo multiple times, according to the value of History States you set in Edit > Preference > Performance.

If you’re used to common Undo’s key combination which is Ctrl + Z, you can simply press Ctrl +Shift + Alt + K to access Keyboard Shortcut panel and change Undo’s key combination under the Edit section to Ctrl + Z.

9. Sampling Color, Anywhere!

Stumbled upon a nicely designed website and wondering which exact colors is it using? This happens very often when I’m seeking inspiration during the time I’m doing site layout in Photoshop. For me I will launch a color picker, pick the color and get its hex number, then click on the color palette in Photoshop, then input the hex number then get the color, pretty annoying isn’t it?

sampling color anywhere 10 Killer Photoshop Tips For Web Designers

Well you don’t really need to suffer like that, you can actually just click on Eyedropper tool or pressing I to activate it, then click on the Photoshop’s work screen and drag the Eyedropper icon to anywhere on the monitor screen to get the color you want. Yeah, it’s really that easy.

Click On Read The Rest Of This Post To Read Full Guide Text & Images...

Sunday 12 June 2011

How To Stream Video to Both iOS and Android Devices With Plex

Plex

Source: how-to-geek By YatriTrivedi

Finding a video streaming solution that does transcoding is tough enough, but trying to find one solution that’ll work for both iOS and Android makes it even harder. Thankfully we have Plex, which does all of this and more.

banner-01

Plex Media Server

01 plex logo

Plex Media Server is an application based off of XBMC that’s primarily built for Mac OS X. It works in two parts: a server app on your desktop and a client app for your mobile device. Plex has been around for a while and even has some awesome plug-ins available. Fortunately for us, the developers made a Windows version that’s pretty wholesome, and there’s even a Linux beta currently in the works and available for download. The Mac OS X version is the definitely the most fully featured, allowing pictures, video, music, and tons of plugins – life Netflix and Hulu – to be streamed to your devices. The Windows version is pretty polished, but doesn’t support Flash/Silverlight plug-ins – no Netflix or Hulu, here. The Linux version is definitely beta – fewer options, no Netflix/Hulu, and the management interface can be really slow – but transcoding and streaming work well on both iOS and Android. Choose the appropriate link below, download the app, and give it quick install.

Installation on Mac OS and Windows is straight-forward and easy. On Windows, it will automatically install Bonjour to enable automatic discovery. If you’re using the Linux beta, make sure you have Avahi installed, then look at the two links below to help get you set up.

Click On Read The Rest Of This Post To Read Full Giide With Text & Images:-

Friday 3 June 2011

How To Broadcast Your Event Live Using Ustream For Free?

Livestream
Source: eventzilla.net

Hosting an event? Now you can use Ustream to broadcast event video LIVE to the world from a computer or iPhone in minutes.

Browser-based Web Broadcaster:

The easiest is the browser-based Web Broadcaster that uses Adobe’s Flash Player. For higher quality, use Ustream Producer (free), Ustream Producer Pro ($199), or Adobe’s Flash Media Live Encoder (free).

Broadcasting from your Mobile Device:

You may also broadcast from your mobile device, but those streams will be slower and lower quality, and not as robust as a wired connection. To start streaming using mobile phones – you can go to www.ustream.tv/mobile to reference currently supported handsets.

1. Creating an Ustream Account

Ustream accounts are free.
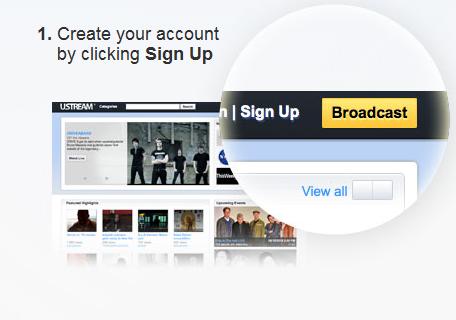
To sign up for an account visit: http://www.ustream.tv/
Click on the sign up link on the top right section of the page.

Ustream-signup

2. Creating a show

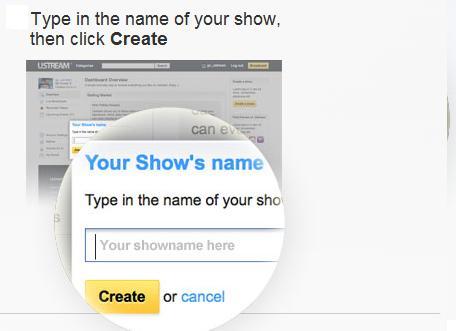
Click on the yellow “Create a show” button on the right side of the page. A box will appear in the middle of the page. Type the name of your event which you would like to host online, in the box provided to you. The name of the Event is recommended, so that it becomes easy for your event to be found and viewed easily. Once you have created a channel, you may not change the URL. Please note that changing the name of your show will not change the URL.

Now, click the yellow “Create” button.

Ustream-show-name

Click On Read the Rest Of This Post to Read Comple Guide With Text & Images:-

Thursday 2 June 2011

How To Cleanup Your Windows 7 Login Screen and Remove Unwanted Logon Items

Source: How-To-Geek

Windows 7 adds functionality to your login screen to give you additional logon options. If you want to lose the clutter, here is how to disable some or all of your credential providers.

Whether it was installed from the factory or add-on software you installed, these registry settings will disable the unwanted credential providers at your login screen.

HKLM\Software\Microsoft\Windows\CurrentVersion\Authentication\Credential Providers

It will not be obvious what some of the providers are but you should be able to determine which one goes to which provider by looking at the value of the (Default) DWORD inside each key.

The screenshot below references the fingerprint scanner on my system but yours may be different.

To disable each of the items, create a DWORD value named “Disable” with a value of 1. For each key you disable it will be removed from your login screen.

Be careful which items you disable or you may not be able to log in with your password either. Only disable the items you know you won’t need and disable them one at a time. This should stop you from disabling too many items and not allowing you to login to your computer.

If you accidentally disable too many items, restart your machine in safe mode and set the disable key to 0 for the providers you need.

Once you have found all the correct keys your new login screen should show only the items you want.

Sincere Thanks To how-to-geek Team to Make This Easy for Us.....


DISCLAIMER


We DO NOT host or upload any of the links or any other content that are available on this WEBSITE. We merely search on INTERNET and index popular sites openly available to anyone. These articles and other content are uploaded to the respective websites (FORUMS) by their User Communities from all over the World and NOT by us. Please Contact Us through E-Mail, if you feel that any Content on this WEBSITE are objectionable or violating your copyrights. The objectionable content shall be promptly removed from our WEBSITE. E mail: