Friday 27 May 2011

How To Configuring Windows XP For Ethernet Connection

Windo
Source: nbcs.rutgers.edu


Configuring Your Network Settings

  1. For users who are using the default view:


  2. Click the Start button and go to Control Panel.


  3. From the Control Panel, under Pick a catergory, click Network and Internet Connections.


  4. From the Network and Internet Connections window, under "or pick a Control Panel icon," click Network Connections and go to Step 3.

  5.  

  6. For users who are using the classic view:


  7. From Start, go to Settings, then Control Panel.


  8. From the Control Panel, double click Network Connections icon.

  9.  

  10. Look at your Network Connections window. 
    If you do not have a Local Area Connection installed, click the icon for Create a new connection under Network Tasks. 
    If you have created a Local Area Connection and want to modify it, right click the icon, highlight Properties and go to 
    Step 9.

    Click On Read The Rest Of this Post To Read Full Article With Text & Images

Tuesday 17 May 2011

How To Repair Laptop LCD Screen Turned Completely White

Source: laptoprepair101
What can you do if the laptop LCD screen turned completely white? From my experience I can tell that this problem may be related to the following:
1. Loose connection between the video cable and the LCD screen.2. Defective LCD screen.3. Defective motherboard (I assume the graphics card is integrated into the motherboard).Here’s an example of a laptop with white screen. When you turn on the laptop, it starts but the image on the screen is completely white right from the beginning. In my case it was a Toshiba Satellite M45 laptop but this problem may occur with any other brand. Most likely you still can use the laptop with an external monitor. Just connect the monitor to the VGA port on the back or side of your laptop and then switch the video output from internal to external mode.On Toshiba laptops you can toggle between internal and external screens using Fn+F5 keys. Hold down Fn and press on F5 until you get video on the external monitor.On IBM laptops use Fn+F7.On HP laptops use Fn+F4.It’s possible that you have to use a different key combination on your laptop but you get the idea.On some laptops, in order to be able to use the external monitor, you have to connect it to the laptop and then restart the laptop so the external monitor is detected by the laptop.Click On Read The Rest Of This Post To Read Complete Guide With Text & Image:-I noticed that in some cases the laptop screen may turn white because of poor connection between the video cable and the LCD screen. If you want to check this connection, you’ll have to take apart the display panel because the connector is located on the back side of the LCD screen.These laptop service manuals and disassembly instructions may be useful.I always check the video cable connection first. Reconnecting the video cable may fix your problem.If reconnecting the video cable doesn’t help, most likely you have a problem either with the LCD screen or with the motherboard.The best way to find out witch one is causing the problem is testing the laptop with another working LCD screen. Without this test you’ll have to guess because as I mentioned before this could either bad motherboard or bad LCD screen.You’ll have to disconnect the video cable from the LCD screen (connector 2) and the inverter board (connectors 3 and 1). After that you connect another working screen and test video.For this purpose I’m using one of my test LCD screens. My test screen is cracked and because of that you see a wide white band in the center but it still works fine for this test.The original screen is white but my test screen works normal (except the crack of course) and I can see the image. After this test I can tell that the problem must be related to the screen.After I assembled everything back together and connected the original LCD, it’s still white.CONCLUSION. In my case this problem is related to the LCD screen and it has to be replaced. Sincere Thanks To Laptoprepair101 Team To Share This With Us.... DISCLAIMER  We DO NOT host or upload any of the links or any other content that are available on this WEBSITE. We merely search on INTERNET and index popular sites openly available to anyone. These articles and other content are uploaded to the respective websites (FORUMS) by their User Communities from all over the World and NOT by us. Please Contact Us through E-Mail, if you feel that any Content on this WEBSITE are objectionable or violating your copyrights. The objectionable content shall be promptly removed from our WEBSITE. E mail:-        how2dothings4u@gmail.com

Sunday 15 May 2011

How To Repair Laptop LCD Screen Turned Completely White

Woodenman131
Source: laptoprepair101
What can you do if the laptop LCD screen turned completely white? From my experience I can tell that this problem may be related to the following:1. Loose connection between the video cable and the LCD screen.2. Defective LCD screen.3. Defective motherboard (I assume the graphics card is integrated into the motherboard).Here’s an example of a laptop with white screen. When you turn on the laptop, it starts but the image on the screen is completely white right from the beginning. In my case it was a Toshiba Satellite M45 laptop but this problem may occur with any other brand. Most likely you still can use the laptop with an external monitor. Just connect the monitor to the VGA port on the back or side of your laptop and then switch the video output from internal to external mode.On Toshiba laptops you can toggle between internal and external screens using Fn+F5 keys. Hold down Fn and press on F5 until you get video on the external monitor.On IBM laptops use Fn+F7.On HP laptops use Fn+F4.It’s possible that you have to use a different key combination on your laptop but you get the idea.On some laptops, in order to be able to use the external monitor, you have to connect it to the laptop and then restart the laptop so the external monitor is detected by the laptop.Click On Read The Rest Of This Post To Read Complete Guide With Text & Image:-I noticed that in some cases the laptop screen may turn white because of poor connection between the video cable and the LCD screen. If you want to check this connection, you’ll have to take apart the display panel because the connector is located on the back side of the LCD screen.These laptop service manuals and disassembly instructions may be useful.I always check the video cable connection first. Reconnecting the video cable may fix your problem.If reconnecting the video cable doesn’t help, most likely you have a problem either with the LCD screen or with the motherboard.The best way to find out witch one is causing the problem is testing the laptop with another working LCD screen. Without this test you’ll have to guess because as I mentioned before this could either bad motherboard or bad LCD screen.You’ll have to disconnect the video cable from the LCD screen (connector 2) and the inverter board (connectors 3 and 1). After that you connect another working screen and test video.For this purpose I’m using one of my test LCD screens. My test screen is cracked and because of that you see a wide white band in the center but it still works fine for this test.The original screen is white but my test screen works normal (except the crack of course) and I can see the image. After this test I can tell that the problem must be related to the screen.After I assembled everything back together and connected the original LCD, it’s still white.CONCLUSION. In my case this problem is related to the LCD screen and it has to be replaced. Sincere Thanks To Laptoprepair101 Team To Share This With Us....DISCLAIMER  We DO NOT host or upload any of the links or any other content that are available on this WEBSITE. We merely search on INTERNET and index popular sites openly available to anyone. These articles and other content are uploaded to the respective websites (FORUMS) by their User Communities from all over the World and NOT by us. Please Contact Us through E-Mail, if you feel that any Content on this WEBSITE are objectionable or violating your copyrights. The objectionable content shall be promptly removed from our WEBSITE. E mail:-        how2dothings4u@gmail.com

Tuesday 10 May 2011

How To Find Your Missing USB Drive in Windows 7 & Vista

Find
Source: How-To-Geek

Sometimes when you plug a USB drive into your machine you won’t see it in Computer or AutoPlay in Windows 7 or Vista. Today we take a look at how to change the drive letter so you can can access it.

The problem with not being able to see your USB drive happens quite often in XP. Our readers have pointed out, and we’re seen instances, where the same problem can occur in Windows 7 and Vista as well. If you’re still running XP and having this problem, make sure to check out our article on how to find your missing USB drive in Windows XP.

Locate and Access the USB Drive in Windows 7 & Vista

The problem is when you plug in a thumb drive or external USB hard drive…nothing happens. You hear the USB sound but AutoPlay doesn’t run, and when you look in Computer you don’t see the drive. More than likely Windows named the drive to a letter that is already in use.

To fix the problem right-click on Computer from the Start Menu or Desktop Icon, and select Manage.

sshot-2010-07-15-[20-35-51]

In the Computer Management window, under Storage, click on Disk Management to see a list of drives connected to your machine.

sshot-2010-07-15-[20-39-55]

You should be able to determine which one is the drive you’re trying to access by its size and format type. Here we’re trying to find a 4GB thumb drive. Right-click on the drive and selectChange Drive Letter and Paths.

sshot-2010-07-15-[20-41-34]

Click On Read The Rest Of This Post To Read Full Guide With Text & Image:-

Thursday 5 May 2011

How To Use Amazon’s 5 GB Cloud Drive On Your Desktop As A Folder

Amazon
Source: AfterDawn.com By Andre

Late last month, Amazon launched their much anticipated Cloud Drive, offering anyone with an Amazon account 5GB of free cloud storage. 


As the company explains it, Amazon Cloud Drive is your hard drive in the cloud. Store your music, videos, photos, and documents on Amazon's secure servers. All you need is a web browser to upload, download, and access your files from any computer. 

If you need more than 5GB, you can pay $1 per GB per year for up to 1TB of storage. 

While Cloud Drive is great (highly recommended), it does not have the same great features of Dropbox, which places a folder on your desktop (or anywhere else) so that you can drag-and-drop files of your choice into the folder and it automatically updates your cloud storage. No need to head to a browser and upload a file. 

In this guide we will teach you how to create a Dropbox-esque folder for Cloud Drive, making the free service into a very useful cloud storage tool. 

If you don't have an Amazon account, get one (and Cloud Drive) here: Amazon Cloud Drive


Introduction & Requirements


Software you must download
 Gladinet Cloud Desktop
 Required: This is the only software you will need for this guide, outside of an Amazon account.Download!

Setting up Gladinet

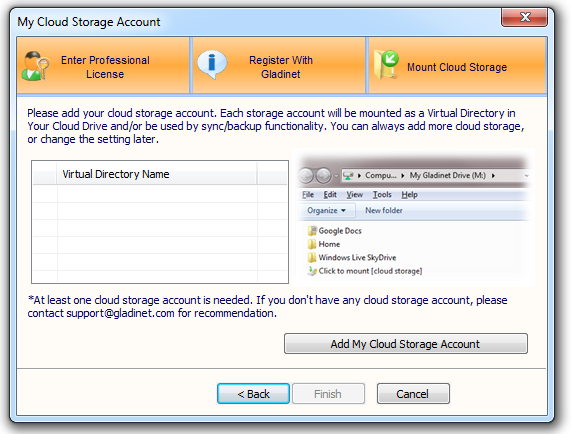
Right from installation, Gladinet will ask you which cloud drive storage you want connect to the app. Hit "Add My Cloud Storage Device" and then move on to the next page.


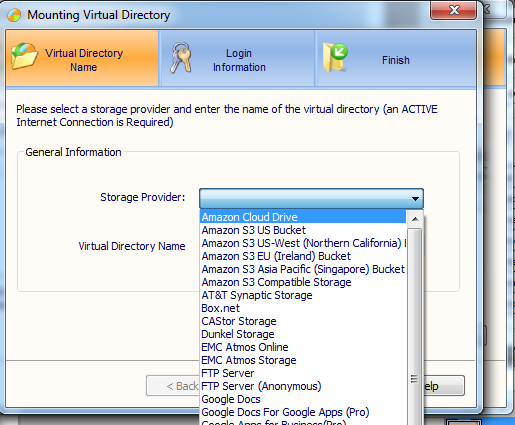
Amazon Cloud Drive should be the first option so make sure to select that and hit "Next." On the next page, enter your Amazon details and hit "next" once again. 

Click On Read The Rest Of This Post To Read Full Guides With Text & Images